How to install & use the Niceshoots plugin for Lightroom
The Niceshoots plugin lets you upload photos to Niceshoots directly from Lightroom Classic — log in, sync your gallery structure, then publish photos with automatic watermarks and cover images, all from within Lightroom.
-
In your Niceshoots Dashboard, go to Management › Integrations and download the Lightroom Plug-in. The download is a
.zipfile. -
Unzip the download and move the
Niceshoots.lrpluginfolder to where you want it stored on your computer.(Safari users: the browser may unzip it automatically — if so, just move it to where you want it.)
Installing the Plug-in
-
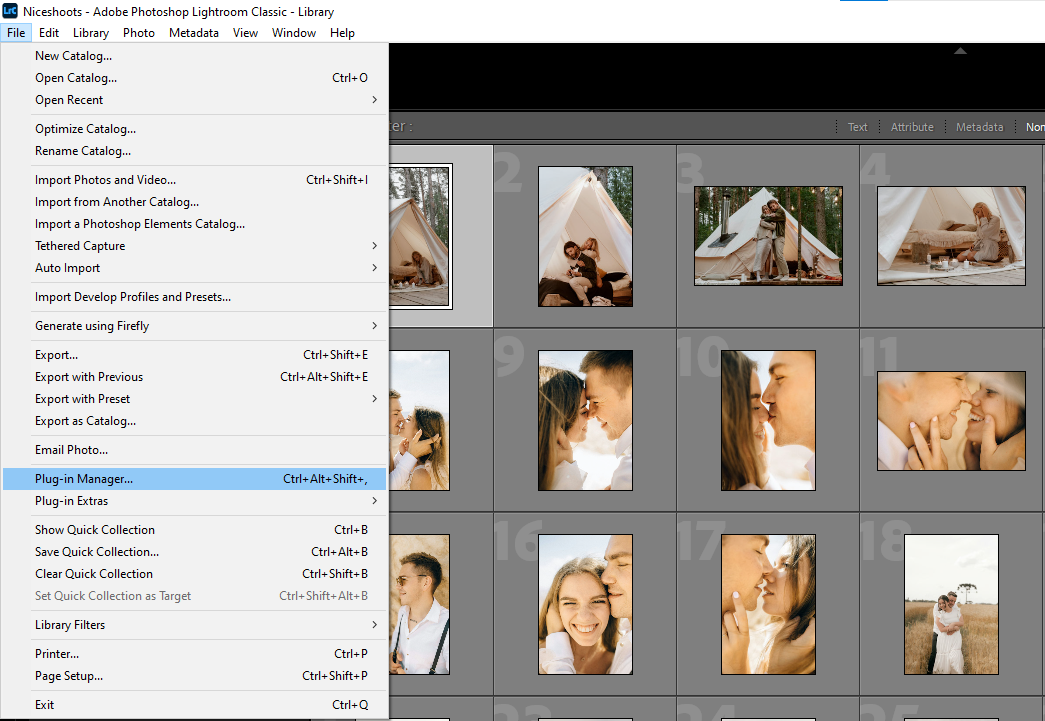
Open Lightroom Classic and select File › Plug-in Manager… (Ctrl + Alt + Shift + , on Windows, ⌘ + ⌥ + ⇧ + , on Mac).
-
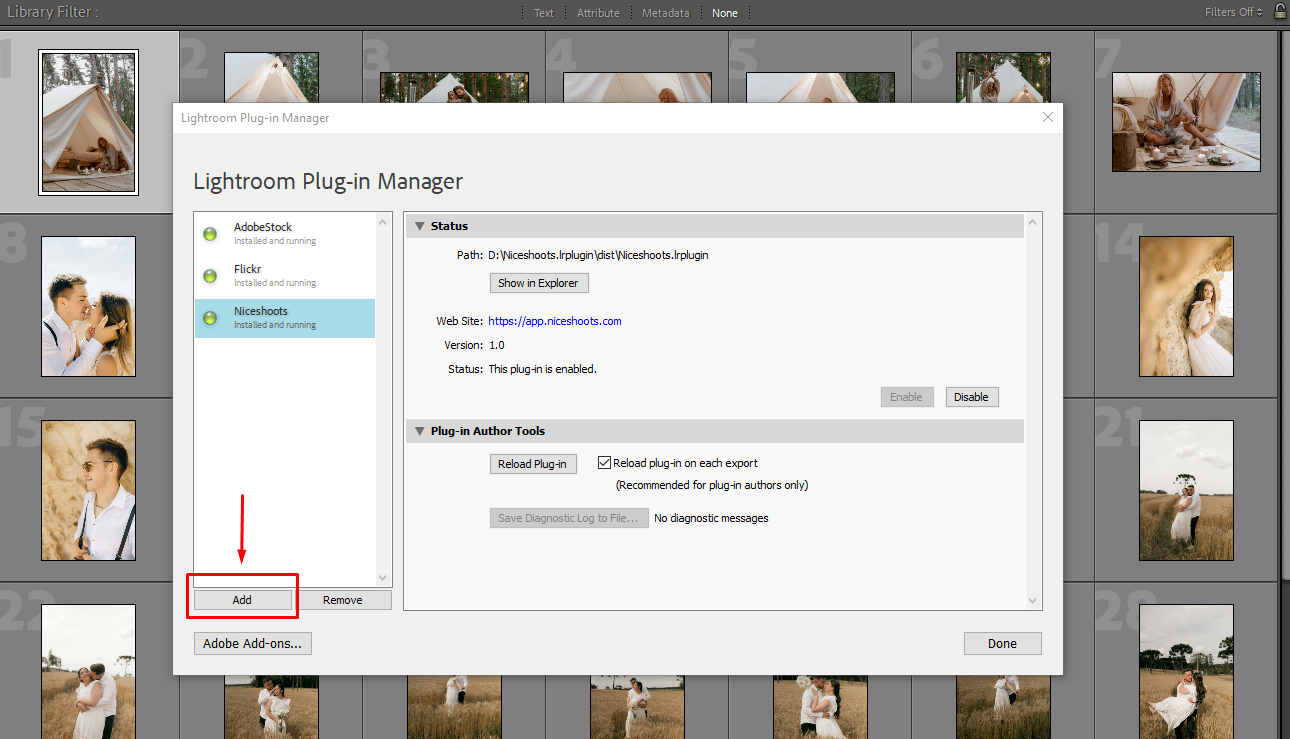
Click the Add button at the bottom-left of the window.
 Note: If you created your Niceshoots account with Google, set a Niceshoots password on your account page to use for the Password field when logging in.
 -
Locate the
Niceshoots.lrpluginfolder you just saved, then click Add Plug-in (Windows) / Select Folder (Mac). -
Click Done — your Niceshoots plug-in is installed! Niceshoots appears in the list with a green light and “This plug-in is enabled.” when it's running correctly.
Setting Up the Plug-in
-
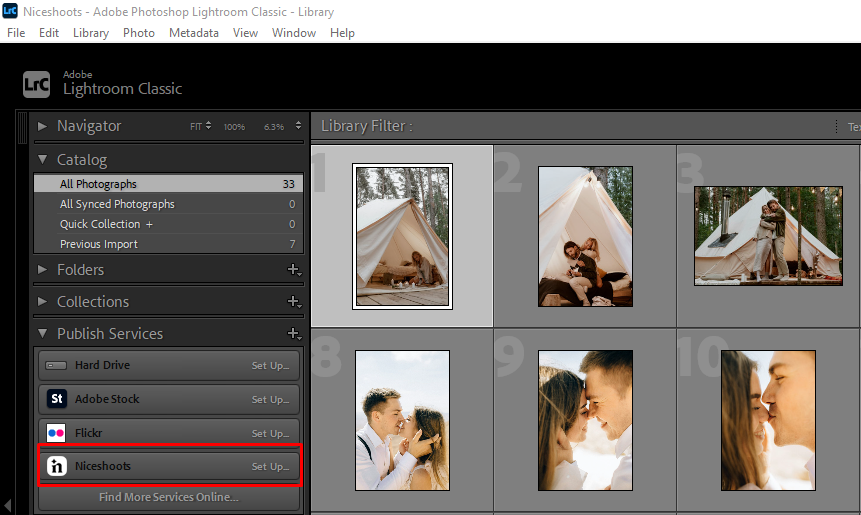
Locate the Niceshoots plug-in under the Publish Services tab (left panel, Library module) and click Set up… (or right-click › Edit Settings… if it already exists).
-
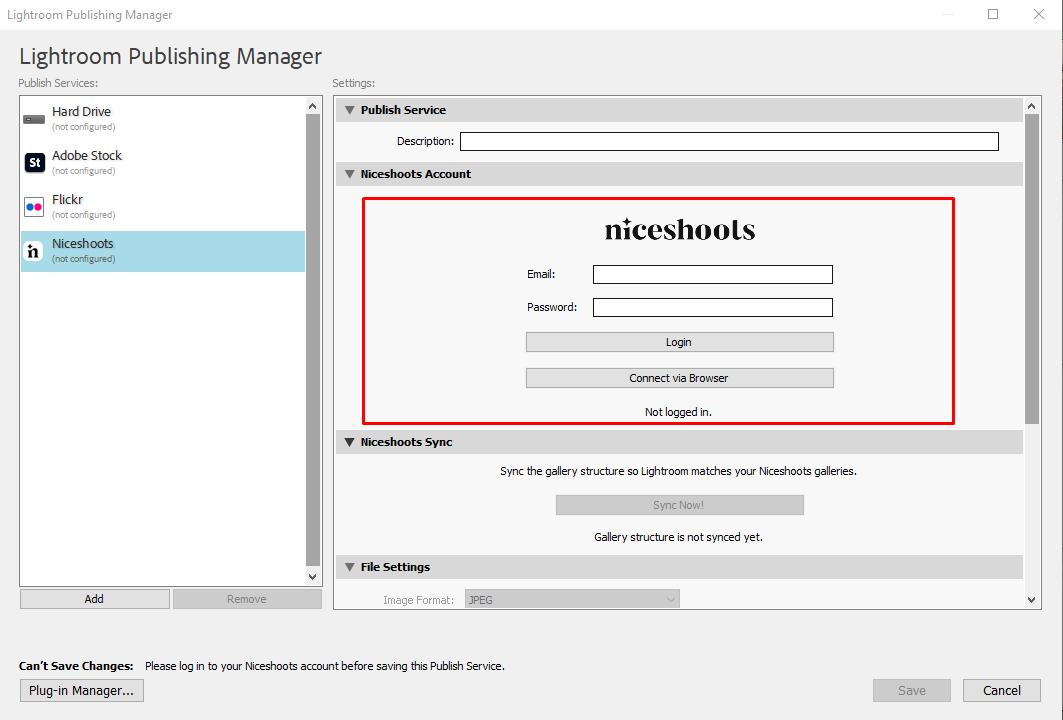
Log in under the Account section: enter your Email + Password and click Login, or click Connect via Browser to sign in through your browser without typing your password in Lightroom. Once logged in, the Account section shows which account you're signed in as (“Logged in as …”).
-
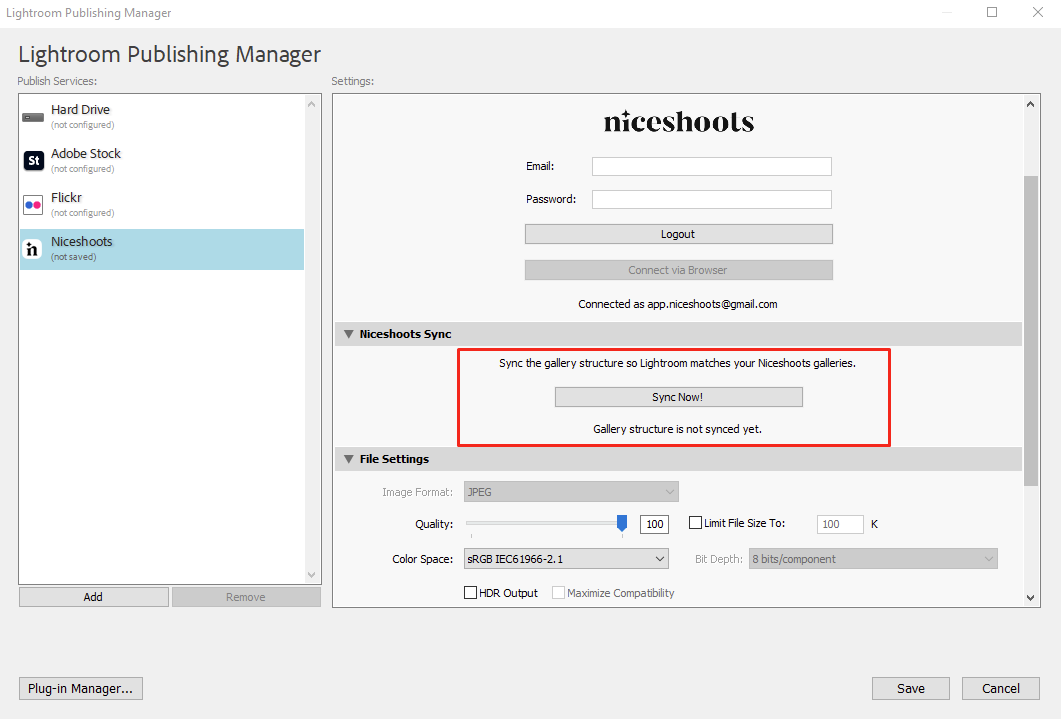
Click Sync Now! to bring your gallery structure from Niceshoots into Lightroom. It doesn't download any photos; but if Lightroom already has photos with the same name as photos on Niceshoots, it will ask to attach (Match) them to the right gallery (see Matching existing photos).
-
Configure other export settings as needed, then click Save.
Syncing your gallery structure
After your first login and Save, the plugin syncs automatically. You can also re-run it anytime with the Sync Now! button in the Niceshoots Sync section of Settings.
- Each sync only adds new galleries; it never deletes galleries or photos you already have.
- A Gallery contains Set Galleries (where you place your photos). The Sets are created from the Preset you choose when creating the gallery.
- If a gallery was deleted on Niceshoots but still exists in Lightroom, the plugin asks whether you want to remove it from Lightroom — your photos are kept.
- If Lightroom already has photos with the same name as photos on Niceshoots, the plugin asks to attach (Match) them to the gallery (see Matching existing photos).
Creating Galleries & Sets manually
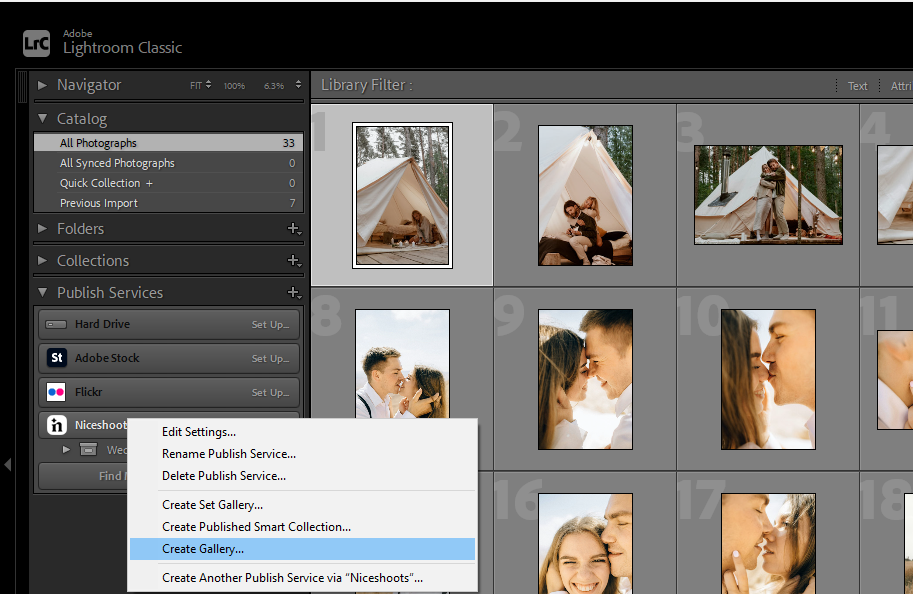
Right-click Niceshoots (or a Gallery) in the Publish Services panel to create new items right in Lightroom:
- Create Gallery…: creates a new Gallery. The Sets inside come from the Preset you choose — not a fixed “Final Photos”.
- Create Set Gallery…: adds a new Set inside the selected Gallery.
- When creating a Gallery, pick a preset in the Niceshoots Preset field (your most recent preset is pre-selected).
Publishing photos to Niceshoots
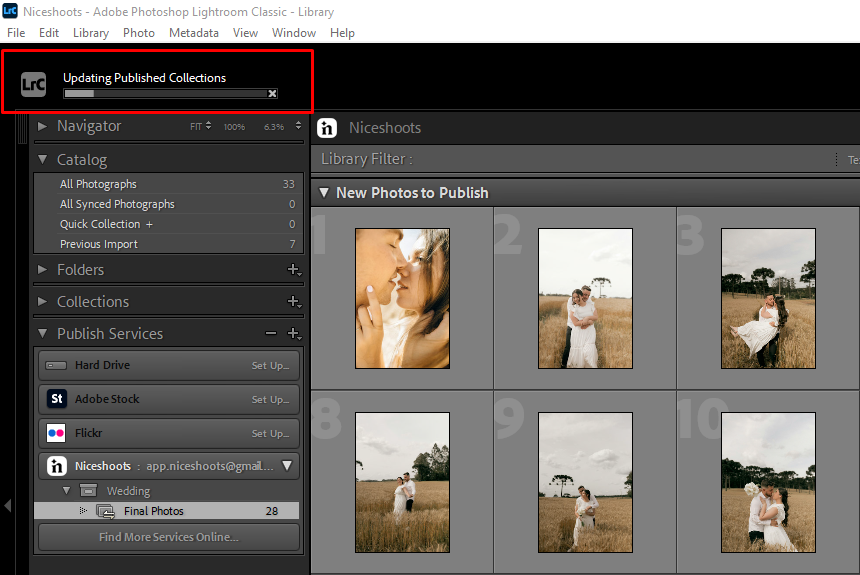
Drag photos into a Set Gallery (a Set inside the gallery), then click Publish. You'll see a progress bar and can click Cancel to stop.
- New photos are uploaded. Photos you already published and then edited are updated in place — no duplicates.
- If the target gallery was deleted on Niceshoots, the plugin recreates it and uploads there.
- If any photos fail, the plugin shows a list of the failed photos with the reason.
Matching photos already in Lightroom
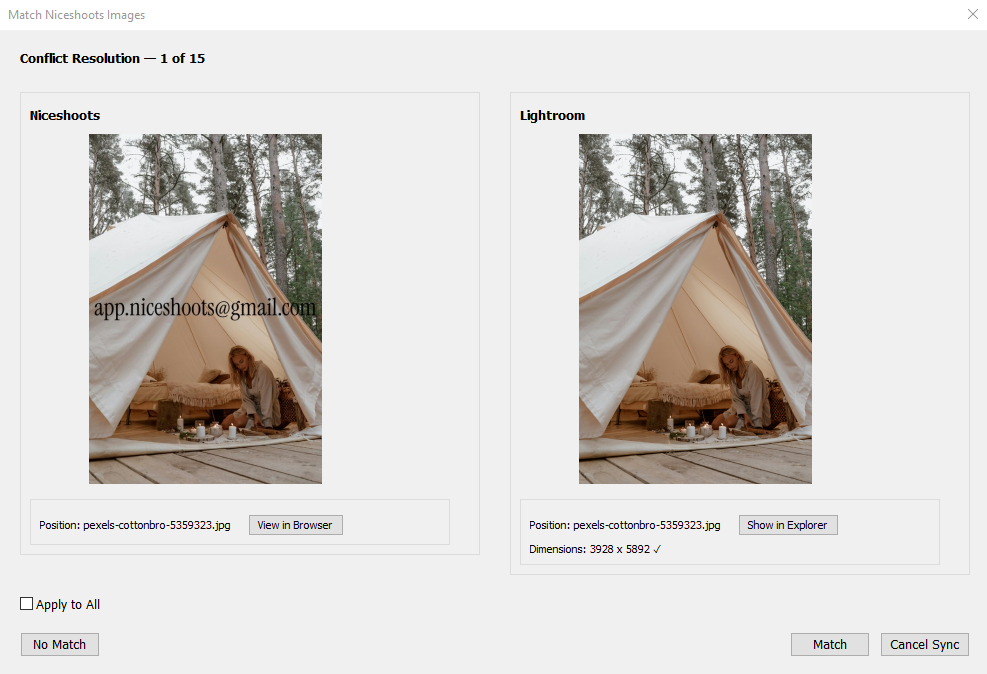
During sync, if Lightroom already has photos with the same name as photos on Niceshoots, the plugin opens the Match Niceshoots Images window so you can confirm — so you don't re-upload photos you already have.
- Two photos are treated as the same when their file names match.
- You can preview the original (View in Browser / Show in Explorer), use Apply to All to handle many at once, or Cancel Sync to stop. Confirmed photos won't be asked again.
Watermark & cover — automatic
- Watermark: if your gallery has a watermark set on Niceshoots, the plugin applies it automatically when you publish — nothing to turn on or off in Lightroom.
- Cover: the first photo you publish to a Gallery without a cover automatically becomes the cover. If the gallery has a watermark, the cover is watermarked too, like the other photos. If the gallery already has a cover, the plugin keeps it.
Renaming & managing
- Rename a Gallery or Set with Rename… in the right-click menu. The new name is updated on Niceshoots right away.
- Show on Niceshoots opens that gallery on the web for a quick look.
Checking your export settings
If your photos are exporting too small, you want to check the quality or resolution, or you're just curious how to adjust it, here's how.
-
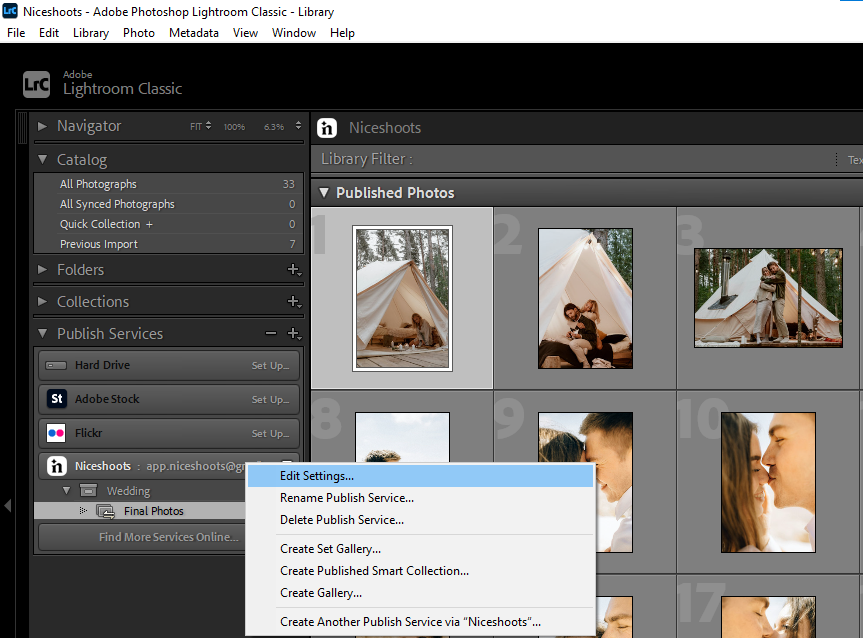
Right-click Niceshoots under the Publish Services tab and choose Edit Settings.
-
In File Settings and Image Sizing, you can view and adjust the image Quality, Color Space, and the size / resolution. The format is fixed to JPEG.
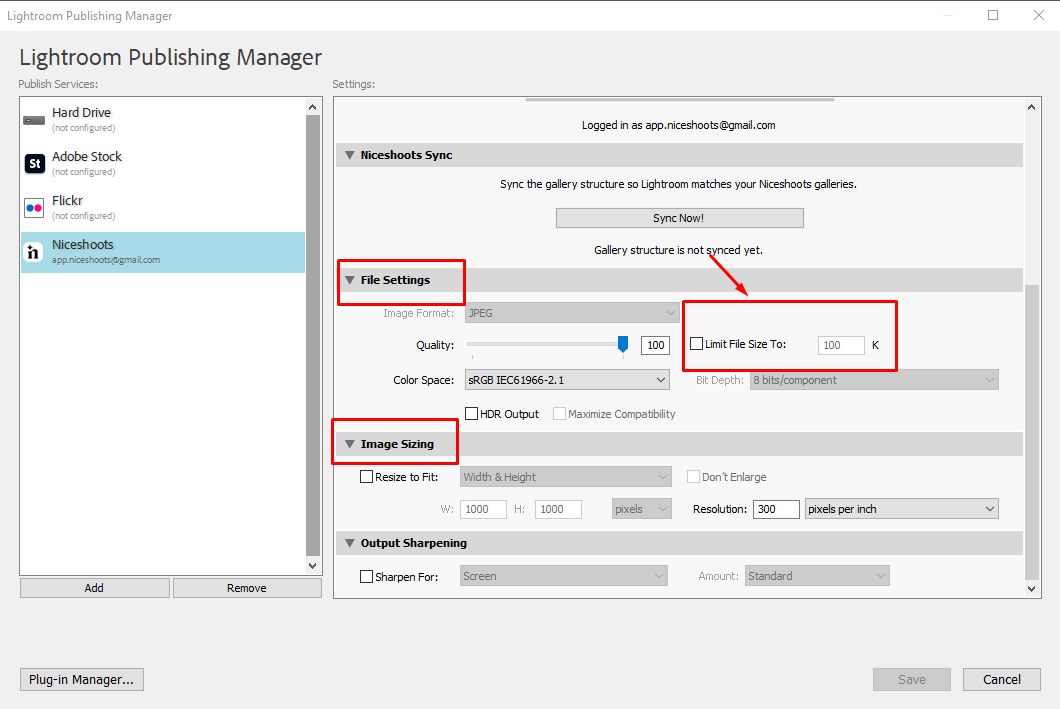
When you're done, click Save — the settings apply to all future exports.
Why do my uploaded images look different on Niceshoots or mobile?
If you see a variation between the colors of your images from your computer and Niceshoots, or from Niceshoots to your mobile device, this usually means your images were saved in the incorrect color space.
We recommend that you save your images in the sRGB color space, because sRGB is fully supported across all devices and printers. Any color spaces larger than sRGB (RGB, AdobeRGB, or ProPhotoRGB) are very large color spaces and, unfortunately, are not fully supported by most systems — which can shift your colors.
Frequently asked questions
What is Niceshoots and why should I use it?
Niceshoots makes booking a photographer easy and hassle-free. No more endless emails, DMs, or confusing systems - just simple, streamlined bookings in a few clicks!
Can I require a deposit/retainer for secure bookings?
Yes! You can set a deposit/retainer, and your clients will pay it right when they book.
How do online contracts and questionnaires work?
You can set up online contracts and questionnaires, so your clients can seamlessly sign contracts and fill out questionnaires during the booking process.
Can I customize my booking page to fit my brand?
Yes, you can customize your booking page to match your brand with your colors, logo, and your own domain.
How do my clients book a mini session?
Your clients can easily book a mini session on Niceshoots by simply selecting a time slot and entering their details. It's that quick and easy!
Can I offer add-ons during the booking process?
Yes, you can easily offer add-ons during the booking process for clients to choose from. It’s a great way to boost your earnings!
Is the booking page mobile-friendly?
Yes, the booking page is fully mobile-friendly, and it works seamlessly on tablets and desktops too, making it easy for clients to book from any device.
How does the waitlist feature work?
When you enable the waitlist feature, if your mini session is fully booked, clients can join the waitlist. Niceshoots will notify them whenever a time slot becomes available.
Focus on your photography. We’ll handle the rest.
Unlock exclusive tools to streamline and elevate your photography bookings with ease.
Get started for Free-
- Booking & inquiry site
- Online payments
- Payment schedule
- Collect retainer
- Accept tips
- Online contracts
- Online questionnaire
- Automated emails
- Calendar
- Payment & booking reminders
- Waitlists
- Finances
- Notification mobile app
- Coupon code
- Gift card
-
- Mobile-optimized website
- Custom logo & branding
- Advanced style settings
- Advanced SEO settings
- Google Analytics
- Meta Pixel
- Custom CSS
- Custom domain
-
- Online photo delivery
- Client favorites
- Downloads
- Photo store
- Watermark protection
- Gallery branding
- Download permissions
- Online photo delivery
- Client favorites
- Downloads
- Photo store
- Watermark protection
- Gallery branding
- Download permissions